What is Node Js?
Node.js is a powerful technology that enables websites to perform various functionalities such as storing user details, payment processing, and data security. For instance, when you add an item to your cart on Amazon, Node.js is responsible for handling the communication between your device and the server. It then responds with the required information. This article is a beginner guide to NodeJS
Is NodeJS really Complex?
In the past, writing Node.js code was complex, but the release of Express.js in 2010 made it much simpler.
What is a framework in node.js?
Node.js essentially simplifies and streamlines the development of applications by providing a pre-built set of tools, libraries, and conventions.
Alternatives of Express.js
1. Koa.js
2. Hapi.js
3. Nest.js
and so on…
Let us take a look at the basics of Node Js without the Express framework.
Node Js provides a vast number of modules like, https, fs, crypto, and so on.
Basics of HTTP Module
As a basic step let’s create a server using the http module. Take a look at this code snippet.
const http = require('http');
const server = http.createServer();
server.listen(3000);
Here require(‘http’) imports the http module from node.js. Use require() syntax from NodeJS
HTTP module enables developers to use node.js in their localhost.
The createServer() on http is an in-built function that takes the callback function as an argument.
http.createServer() returns a server variable that holds the reference of the HTTP server object which is created under the hood. To listen on a port server.listen(3000) is used.
3000 is the port number. You can use any available port on your PC.
Feel free to explore all the methods that are available on the server variable.
Now that we know how to create a local server, let us dive into creating a callback function which was previously mentioned.
const http = require("http");

function rqListener(req, res) {
  res.write("hello");
  res.write("<html><p>Hello there!</p></html>");
  res.statusCode = 302;//302 indicates that the response is found
  res.end();
}
const server = http.createServer(rqListener);

server.listen(3000);
As previously mentioned the callback function takes two arguments request and response.
What could be the request and response here?
request object returns metadata which will be then used to set headers, method of request, URL, and so on…
If you are confused about setting headers, requests, etc…. visit the MDN page for clear reference https://developer.mozilla.org/en-US/docs/Web/HTTP/Headers
response argument is used to set the contents, and headers and manage when to stop giving the response.
You can implicitly set the status code of the response using res.statusCode.
In this case, the status is set to 302 which indicates that the response has been found.
To know more about status codes visit https://developer.mozilla.org/en-US/docs/Web/HTTP/Status
As the name suggests res.write() writes some content to the browser document.
Finally, res.end() indicates no other code should be written after that statement. If then, it will result in an error.
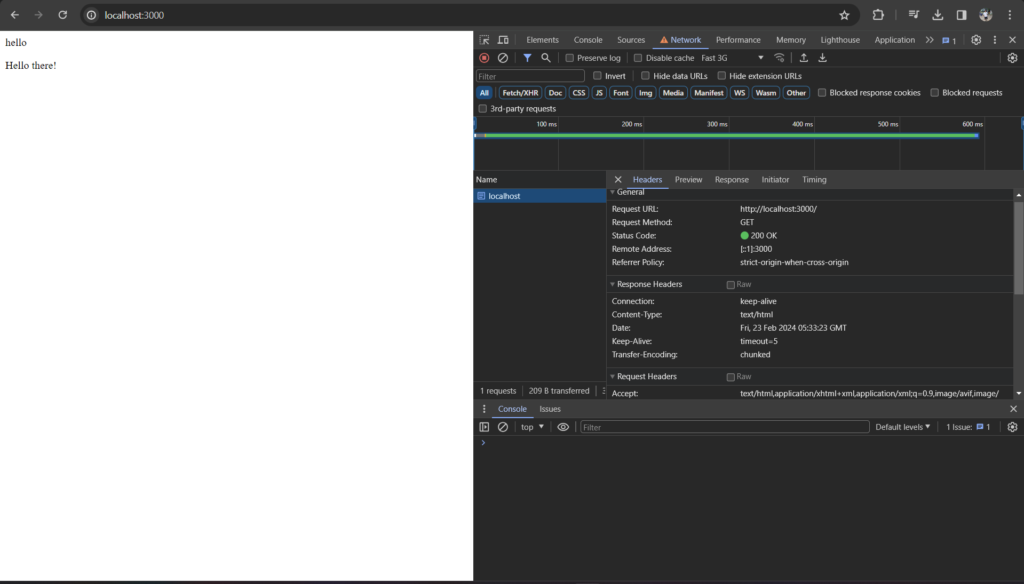
You can see in the dev tools that the headers have been changed/modified.
Then the document contains content that has been written in res.write().
Do you know that?
The location, and content type of the response can be set using res.setHeader() function.
Here is an example code using the setHeader() function.
const http = require("http");

function rqListener(req, res) {
  res.setHeader("Location", "/");
  res.setHeader("Content-Type", "text/html");
  res.statusCode = 302; // 302 indicates that the response is found
  res.end("<html><p>Hello there!</p></html>");
}

const server = http.createServer(rqListener);

server.listen(3000);
Now, with the above knowledge we have successfully rendered some content to the document!
Let’s move further into getting the user-entered data.
With the above code, let us append some code with the conditional logic implied.
const http = require("http");

function rqListener(req, res) {
  const url = req.url;
  if (url === "/") {
    res.setHeader("Content-Type", "text/html");
    res.write("hello");
    res.write("<html><p>Hello there!</p></html>");
    return res.end();
  }
  if (url === "/custom-url") {
    res.setHeader("Content-Type", "text/html");
    res.write("This is a custom url page!");
    return res.end();
  }
}

const server = http.createServer(rqListener);
server.listen(3000);
Take your time and try it on your machine!
Hope you have done.
This is nothing but a simple if statement that indicates if the current URL is “/” some html content will render.
Similarly for other URLs, in this case “/custom-url”, some different text will render.
Note
For every empty page, unless the default URL is changed, the default URL will be “/”
Of course, it is up to you to set whichever URL you prefer.
Now let us move on to getting the user data that is entered via an HTML form.
How the user’s data is handled by node Js?
Node doesn’t directly give the data. The data is broken down into multiple encoded chunks and given to us in a stream of data. As a developer, we have to decode it using the buffer object.
The below code will give you an example of decoding the data using a Buffer object.
const http = require("http");

function rqListener(req, res) {
  const url = req.url;
  if (url === "/") {
    res.setHeader("Content-Type", "text/html");
    res.write("hello");
    res.write("<html><p>Hello there!</p></html>");
    return res.end();
  }
  if (url === "/add-detail") {
    const body = [];
    res.setHeader("Content-Type", "text/html");
    res.write(
      "<html><form method='post' action='/add-detail'><input type='text'
       name='detail'/><button type='submit'>Add</button></form></html>"
    );
    req.on("data", (chunks) => {
      body.push(chunks);
      console.log(chunks);
    });
    req.on("end", () => {
      const parsedContent = Buffer.concat(body).toString();
      console.log(parsedContent);
      console.log(parsedContent.split("=")[1]);
    });
    return res.end();
  }
}

const server = http.createServer(rqListener);

server.listen(3000);
req.on() is an event handler that will allow us to listen to specific events occurring on the current request. It can have two arguments first is the target argument which will be a string and the second argument is the callback function.
In the req.on(“data”,()=>{}) code part, it indicates that when the request is carrying some data, the call-back function will have chunks as default arguments and we are gonna push those chunks to an empty array.
The output of the chunks will look like this

Similarly req.on(“end”,()=>{}) indicates that when the current request is going to end, the call-back function will decode it through some logic.
The chunks stored in the body array are concatenated to a single Buffer object using Buffer.concat(body) that is then converted to string using the good old javascript toString() method.
The output of the parsed data will be like this

The next line console.log(parsedContent.split(“=”)[1]);. This line further processes the parsed content. It splits the string at the “=” character, creating an array of substrings. Then, it retrieves the second element of the array ([1]), which corresponds to the value of the data submitted in the form.
Conclusion
Horray! You have successfully learned the basics in this beginner guide for NodeJS. This will be enough knowledge to dive into express JS.
Of course, feel free to dive into more core node Js methods if you are interested.
Here is a link for the official node Js documentation: https://nodejs.org/en
Read other similar interesting articles at https://www.codinousar.com/
Horray! You have successfully learned the basics in this beginner guide for NodeJS. This will be enough knowledge to dive into express JS.









Responses (0)